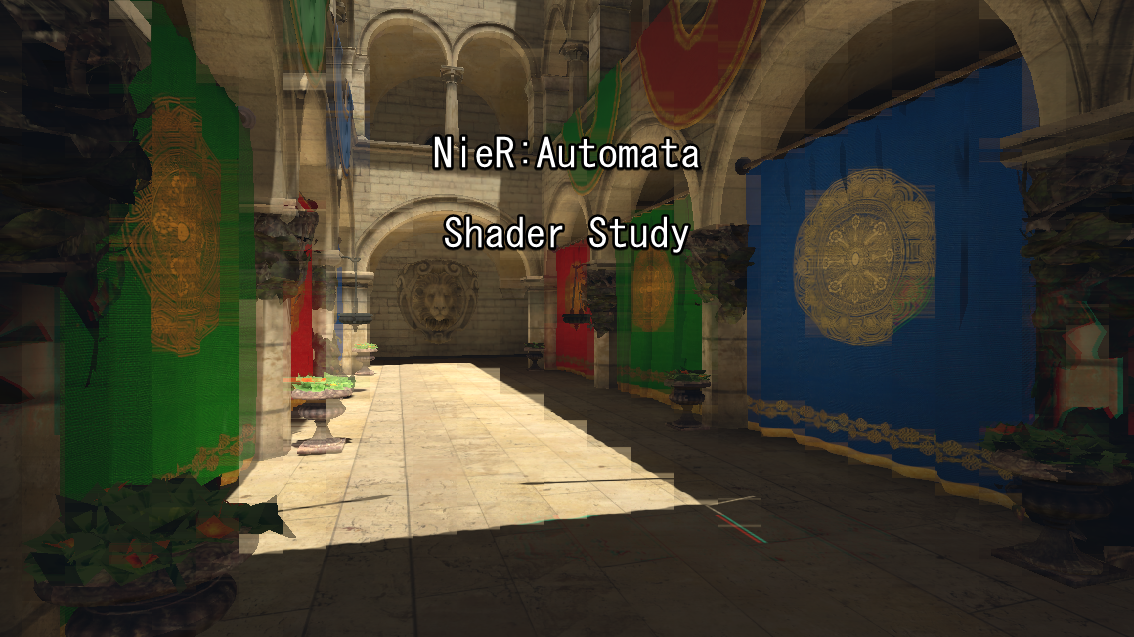
NieR:Automata Glith Effect
Thomaz Nardelli | Shader Study

Recently I played NieR:Automata and was simply amazed, so I decide to replicate one of the glitch effects that appear in the end of the game.
Shader Breakdown
First we need to breakdown the shader into small pieces, so it's easy to replicate one by one.

Pixelization

Color Separation (Damage)

Color Corruption and Color Separation

Desaturation, Lens Distortion and Chromatic Aberration
Alright, now that we have the small pieces we can start replicating one at a time.
Pixelization
It appears that the pixelization effect only happens in vertical lines, so to do that we need to sample the screen in a different resolution in the U axis.
float glitchStep = lerp(4, 32, _Rnd);
float glitchUV = round(i.uv.x * glitchStep) / glitchStep;
fixed4 glitchCol = tex2D(_MainTex, float2(glitchUV, i.uv.y));
We first get a random (from a C# script) value to change the resolution on the fly, notice how in the original shader it keep changing.
Then we posterize the UV with the ammount of steps we need.
And finally we sample the screen using our new UV (but only the U, the V is untouched)

The effect is kinda strong though, to solve that we can lerp between the glitch color and the screen color.
fixed4 glitchFinal = lerp(scrCol, glitchCol, 0.25);
Let's use 0.25 for now, but later we will change to a value controled by a C# script.

Way better!
Color Separation
When the player take dmg in the game there is a color separation effect, this is also really simple to make, just sample the scene color 2 extra times, one for the R channel and other for the B channel, then offset by a noise teture and combine with the unmodified screen color.
fixed chrNoise = tex2D(_Noise, frac(i.uv + _Rnd2 * 10)*0.5);
fixed chrNoise2 = tex2D(_Noise, frac(i.uv + _Rnd * 10)*0.75);
First we sample the noise texture 2 times, the _Rnd and _Rnd2 are random values generated by the CPU, we do this to prevent obvious patterns from showing up.

The noise texture
Then we step those 2 textures to get a binary value and remap to -1 ~ 1.
float chrOffset = step(0.5*(chrNoise + chrNoise2), 0.5);
chrOffset = (2 * chrOffset + 1) * 0.005 * _Dmg;
The _Dmg is also calculated on the CPU, just a simple timer so it can be triggered like in the game.
This will give us a result like this one.

Now all we got to do is sample the texture with the 2 offsets.
fixed3 chrColR = tex2D(_MainTex, float2(i.uv.x + chrOffset, i.uv.y));
fixed3 chrColB = tex2D(_MainTex, float2(i.uv.x - chrOffset, i.uv.y));

But there is also a color separation that happens even without dmg, so let's also add that.
fixed3 chrCol2R = tex2D(_MainTex, float2(i.uv.x + step(0.5*(chrNoise + chrNoise2), 0.2) * 0.005, i.uv.y));
fixed3 chrCol2B = tex2D(_MainTex, float2(i.uv.x - step(0.5*(chrNoise + chrNoise2), 0.1) * 0.005, i.uv.y));
And then we lerp both using the _Dmg variable.
fixed4 finalScrCol = fixed4(0, 0, 0, 0);
finalScrCol.r = lerp(chrCol2R.r, chrColR.r, _Dmg) - step(chrNoise2, 0.2);
finalScrCol.g = scrCol.g + step(chrNoise, 0.2);
finalScrCol.b = lerp(chrCol2B.b, chrColB.b, _Dmg) - step(chrNoise2, 0.2);
The step is to make the a mask for the color separation, so it's not on the whole screen.

Color Corruption
Most of the work for this effect is already done in the color separation, simply add a multiplier to our finalScrCol.
finalScrCol.r = lerp(chrCol2R.r, chrColR.r, _Dmg) - step(chrNoise2, 0.2) * _Corruption;
finalScrCol.g = scrCol.g + step(chrNoise, 0.2) * _Corruption;
finalScrCol.b = lerp(chrCol2B.b, chrColB.b, _Dmg) - step(chrNoise2, 0.2) * _Corruption;
_Corruption is just a float, just remember to keep it small!

The exagerated effect
Lens Distortion
Finally we got to the last bit.
float aberration = pow(((length(i.uv * 2 - 1)) - (_SinTime.z)*0.1), 2);
Here we remap the uv to -1 ~ 1, then we get it's length, this will result in a circular mask

Notice that the distortion have a pulse motion in the game, so here we subtract the _SintTime to get that movement.
Now that we have the mask ready, let's get it to distort our screen.
fixed4 lensBlur = tex2D(_MainTex, i.uv - (i.uv* 2 - 1) * aberration * 0.0125*2);
fixed4 lensBlur2 = tex2D(_MainTex, i.uv - (i.uv * 2 - 1) * aberration * 0.0125);
fixed4 lensBlur3 = tex2D(_MainTex, i.uv - (i.uv * 2 - 1) * aberration * 0.025);
There is a small blur in the original effect, I'm doing one here by applying a different offset to an extra sample.
We now get one of those samples, desaturate it, and subtract to get the difference from the original screen color.
fixed lensAbrR = dot((lensBlur3 - scrCol), float3(0.3, 0.59, 0.11));

The chromatic aberration mask
Then all that's left is to combine everything we've done so far!
fixed4 compositeCol = lerp(finalScrCol, glitchFinal, _GlitchAmmount);
fixed4 desaturatedCol = dot((scrCol + lensBlur + lensBlur2) / 3, float3(0.3, 0.59, 0.11));
desaturatedCol += fixed4(lensAbrR*2, 0, 0, 0);

return lerp(compositeCol, desaturatedCol, _Desaturate);

And we are done!!
Here is the finished shader in action.
